Wbudowane obiekty
Pygame Zero dostarcza użytecznych obiektów wbudowanych, które ułatwią Ci tworzenie gier.
Ekran
Obiekt screen („ekran”) reprezentuje ekran Twojej gry.
To cienka warstwa wokół obiektu powierzchni z biblioteki Pygame, która pozwala łatwo rysować obrazki na ekranie („blitować” je).
- class Screen
- surface
Surowy obiekt powierzchni z Pygame reprezentujący bufor ekranu. Możesz używać go do zaawansowanych operacji graficznych.
- bounds()
Nowe w wersji 1.3.
Zwraca obiekt ZRect reprezentujący granice ekranu.
- clear()
Czyści ekran do czerni.
- fill((red, green, blue)[, gcolor=(r, g, b)])
Wypełnia ekran jednolitym kolorem, określonym jako zestaw (czerwony, zielony, niebieski).
Nowe w wersji 1.3: Jeśli podano argument
gcolor, ekran zostaje wypełniony gradientem od koloru z pierwszego parametru na górze, do kolorugcolorna dole.
- blit(image, (left, top))
Rysuje obraz na ekranie w podanym miejscu.
blit()może przyjąć jako parametrimagealbo obiekt typuSurface, albo napis. Jeśliimagejest napisem, obraz o podanej nazwie zostanie załadowany z kataloguimages/.
- draw.line(start, end, (r, g, b), width=1)
Rysuje linię od pozycji
startdo pozycjiendo podanej szerokości (width).
- draw.circle(pos, radius, (r, g, b), width=1)
Rysuje okrąg podaną grubością linii.
- draw.filled_circle(pos, radius, (r, g, b))
Rysuje koło.
- draw.rect(rect, (r, g, b), width=1)
Rysuje obrys prostokąta podaną grubością linii.
Jako pierwszy parametr przyjmuje obiekt Rect.
- draw.filled_rect(rect, (r, g, b))
Rysuje wypełniony prostokąt.
- draw.text(text, [pos, ]**kwargs)
Wypisuje tekst.
Istnieje bardzo bogate API służące do pozycjonowania i formatowania tekstu; zobacz szczegóły w rozdziale Text Formatting.
- draw.textbox(text, rect, **kwargs)
Wypisuje tekst o wielkości dostosowanej, by wypełnić dany prostokąt (Rect (prostokąt)).
Istnieje bardzo bogate API służące do formatowania tekstu; zobacz szczegóły w rozdziale Text Formatting.
Wskazówka
Wszystkie kolory mogą być określane jako zestawy (r, g, b)
(czerwony, zielony, niebieski), albo przez nazwę, używając
jednej z nazw kolorów w Pygame.
Rect (prostokąt)
Klasa Rect z Pygame jest dostępna jako wbudowana. Można jej używać na różne sposoby, od wykrywania klików w danym regionie, po rysowanie prostokątów na ekranie.
Na przykład, możesz narysować prostokąt w taki sposób:
CZERWONY = 200, 0, 0
PROSTOKĄT = Rect((20, 20), (100, 100))

def draw():
    screen.draw.rect(PROSTOKĄT, CZERWONY)
Ładowanie zasobów
Obiekty images i sounds służą do ładowania obrazów i dźwięków z plików
zapisanych, odpowiednio, w katalogach images i sounds.
Pygame Zero obsłuży ładowanie tych zasobów na żądanie i zachowa je,
unikając zbędnego wielokrotnego ładowania ich.
Twoje obrazy muszą mieć nazwy złożone tylko z małych liter, cyfr i znaków podkreślenia. Muszą też zaczynać się od litery.
Nazwy plików, które będą dobrze działy z mechanizmem ładowania zasobów:
alien.png
alien_hurt.png
żółw_numer_7.png
A takie nie zadziałają:
3.png
3stopnie.png
moj-kot.png
pies george'a.png
Mechanizm ładowania zasobów zachowuje załadowane obrazy i dźwięki w pamięci podręcznej (cache). Aby opróżnić tę pamięć (np. z powodu problemów z pamięcią), użyj funkcji unload() i unload_all().
Przykład:
krowa = Actor('krowa')
loader.images.unload('krowa')  # usuwa obraz krowa.png z pamięci podręcznej
loader.images.unload_all()     # usuwa wszystkie obrazy z pamięci podręcznej
Obrazy
Pygame Zero potrafi ładować obrazy w formatach .png, .gif, i .jpg.
Zalecamy format PNG: obsługuje wysokiej jakości obrazy z przezroczystością.
Potrzebujemy się upewnić, że katalog images istnieje.
Jeśli Twój projekt zawiera następujące pliki:
kosmiczna_gra.py
images/kosmita.png
To kosmiczna_gra.py może narysować duszka «alien» na ekranie za pomocą
tego kodu:
def draw():
    screen.clear()
    screen.blit('kosmita', (10, 10))
Nazwa przekazana do funkcji blit() to nazwa pliku obrazu w katalogu images,
bez rozszerzenia pliku.
Albo, używając API aktora:
kosmita = Actor('kosmita')

def draw():
    kosmita.draw()
W obu przypadkach są pewne ograniczenia narzucone nazwom plików: mogą zawierać tylko małe litery łacińskie, cyfry i znaki podreślenia. Służy to uniknięciu problemów z kompatybilnością, gdy Twoja gra będzie używana pod innym systemem operacyjnym, który inaczej traktuje wielkość liter w nazwach plików.
Powierzchnie obrazów
Możesz także ładować obrazy z katalogu images używając obiektu images.
Dzięki temu możesz pracować bezpośrednio z danymi obrazów, pobierać
ich rozmiary itp.:
las = []
for i in range(5):
    las.append(
        Actor('drzewo', topleft=(images.drzewo.get_width() * i, 0))
    )
Każdy załadowany obraz jest obiektem Surface („powierzchnia”) Pygame.
Zazwyczaj będziesz używać metody screen.blit(...) do rysowania tych obrazów
na ekranie. Obiekt ten dostarcza dostarcza również przydatnych metod pozwalających
zbadać rozmiar obrazu w pikselach:
- class Surface
- get_width()
Zwraca szerokość obrazu w pikselach.
- get_height()
Zwraca wysokość obrazu w pikselach.
- get_size()
Zwraca zestaw (krotkę)
(wysokość, szerokość)oznaczającą rozmiar powierzchni w pikselach.
- get_rect()
Zwraca obiekt
Rectz oznaczonymi granicami obrazu przy założeniu że obraz byłby zlokalizowany w punkcie (0, 0).Efektywnie, jest to równoważne z:
Rect((0, 0), obraz.get_size())
Dźwięki
Pygame Zero może wczytywać dźwięki w formatach .wav i .ogg.
WAV jest świetny do małych efektów dźwiękowych, podczas gdy OGG to skompresowany
format bardziej przystosowany do muzyki. W sieci możesz znaleźć
pliki .ogg i .wav dostępne do swobodnego użycia, które możesz wykorzystać
w swojej grze.
Potrzebujemy się upewnić, że katalog sounds istnieje.
Jeśli Twój projekt zawiera następujące pliki:
perkusja.py
sounds/werbel.wav
To perkusja.py może zagrać dźwięk werbla przy każdym naciśnięciu
przycisku myszy, używając tego kodu:
def on_mouse_down():
    sounds.werbel.play()
Każdy załadowany dźwięk to obiekt Sound z Pygame, i ma różne metody
pozwalające odtwarzać i zatrzymywać dźwięk, oraz badać jego długość w sekundach:
- class Sound
- play()
Odtwarza dźwięk.
- play(loops)
Otrwarza dźwięk, zapętlając go podaną liczbę razy.
- Parametry
loops – Liczba pętli zapętlonego dźwięku. Jeśli przekażesz
-1jako liczbę pętli, dźwięk będzie się odtwarzał bez końca (albo dopóki nie wywołasz metodySound.stop()).
- stop()
Zatrzymuje odtwarzanie dźwięku.
- get_length()
Zwraca długość dźwięku w sekundach.
Staraj się unikać używania obiektu sounds do odtwarzania dłuższych fragmentów muzyki.
Ponieważ system dźwięków ładuje całą muzykę do pamięci przed odtworzeniem jej,
może to powodować nadmierne zużycie pamięci, i opóźnienie odtwarzania o czas ładowania
muzyki.
Muzyka
Nowe w wersji 1.1.
Ostrzeżenie
API muzyki jest eksperymentalne i może być źródłem problemów z kompatybilnością między różnymi platformami.
W szczególności:
Obsługa formatu MP3 może nie być dostępna w niektórych dystrybucjach Linuksa.
Wygląda na to, że niektóre pliki OGG Vorbis zawieszają Pygame ze 100-procentowym zużyciem procesura.
W przypadku tego ostatniego problemu, można go rozwiązać przez przekodowanie pliku (być może innym enkoderem).
Wbudowany obiekt o nazwie music pozwala odtwarzać muzykę z katalogu
music/ (obok Twoich katalogów images/ i sounds/,
jeśli je masz). System muzyki będzie ładował ścieżkę muzyczną po trochu w trakcie
jej odtwarzania, unikając problemów z używaniem obiektu sounds do
odtwarzania dłuższych ścieżek.
Inną różnicą w stosunku do systemu dźwięków jest to, że tylko jedna ścieżka muzyki może być odtwarzana jednocześnie. Jeśli zaczniesz odtwarzać inną ścieżkę, ścieżka odtwarzana poprzednio zostanie zatrzymana.
- music.play(name)
Odtwarza ścieżkę muzyczną ze wskazanego pliku. Ścieżka będzie zapętlona bez końca.
Zastępuje to aktualnie odtwarzaną ścieżkę i anuluje wszelkie ścieżki umieszczone w kolejce przez wywołanie
queue().Nie musisz dodawać rozszerzenia nazwy pliku ścieżki; na przykład, by odtworzyć plik
mozart.mp3w pętli:music.play('mozart')
- music.play_once(name)
Podobnie do
play(), ale muzyka zostanie zatrzymana po pojedynczym odtworzeniu.
- music.queue(name)
Podobnie do
play_once(), ale zamiast zatrzymywać aktualnie odtwarzaną muykę, ścieżka zostanie dodana do kolejki do odtworzenia, gdy aktualnie odtwarzana ścieżka skończy się (i po wszystkich innych ścieżkach już wcześniej umieszczonych w kolejce).
- music.stop()
Zatrzumuje muzykę.
- music.pause()
Przerywa muzykę tymczasowo. Można ją wznowić, wywołując
unpause().
- music.unpause()
Wznawia odtwarzanie muzyki.
- music.is_playing()
Zwraca
Truejeśli muzyka jest odtwarzana (i nie jest przerwana),Falsew przeciwnym przypadku.
- music.fadeout(duration)
Wycisza, po czym zatrzymuje aktualnie odtwarzaną muzykę.
- Parametry
duration – Czas trwania wyciszenia muzyki. Na przykład, by wyciszyć muzykę w ciągu pół sekundy, wywołaj
music.fadeout(0.5).
- music.set_volume(volume)
Ustawia głośność systemu muzyki.
Przyjmuje liczbę pomiędzy 0 (całkowita cisza) a 1 (pełna głośność).
- music.get_volume()
Zwraca aktualną głośność systemu muzyki.
Po zaczęciu odtwarzania muzyki przy użyciu music.play_once(), możesz
użyć haka on_music_end(), by zrobić coś kiedy muzyka
się skończy — na przykład, wylosować kolejną ścieżkę.
Zegar
Often when writing a game, you will want to schedule some game event to occur at a later time. For example, we may want a big boss alien to appear after 60 seconds. Or perhaps a power-up will appear every 20 seconds.
More subtle are the situations when you want to delay some action for a shorter period. For example you might have a laser weapon that takes 1 second to charge up.
We can use the clock object to schedule a function to happen in the
future.
Let’s start by defining a function fire_laser that we want to run in the
future:
def fire_laser():
    lasers.append(player.pos)
Then when the fire button is pressed, we will ask the clock to call it for
us after exactly 1 second:
def on_mouse_down():
    clock.schedule(fire_laser, 1.0)
Note that fire_laser is the function itself; without parentheses, it is
not being called here! The clock will call it for us.
(It is a good habit to write out times in seconds with a decimal point, like
1.0. This makes it more obvious when you are reading it back, that you are
referring to a time value and not a count of things.)
clock provides the following useful methods:
- class Clock
- schedule(callback, delay)
Schedule callback to be called after the given delay.
Repeated calls will schedule the callback repeatedly.
- Parametry
callback – A callable that takes no arguments.
delay – The delay, in seconds, before the function should be called.
- schedule_unique(callback, delay)
Schedule callback to be called once after the given delay.
If callback was already scheduled, cancel and reschedule it. This applies also if it was scheduled multiple times: after calling
schedule_unique, it will be scheduled exactly once.- Parametry
callback – A callable that takes no arguments.
delay – The delay, in seconds, before the function should be called.
- schedule_interval(callback, interval)
Schedule callback to be called repeatedly.
- Parametry
callback – A callable that takes no arguments.
interval – The interval in seconds between calls to callback.
- unschedule(callback)
Unschedule callback if it has been previously scheduled (either because it has been scheduled with
schedule()and has not yet been called, or because it has been scheduled to repeat withschedule_interval().
Note that the Pygame Zero clock only holds weak references to each callback you give it. It will not fire scheduled events if the objects and methods are not referenced elsewhere. This can help prevent the clock keeping objects alive and continuing to fire unexpectedly after they are otherwise dead.
The downside to the weak references is that you won’t be able to schedule lambdas or any other object that has been created purely to be scheduled. You will have to keep a reference to the object.
Actors
Once you have many images moving around in a game it can be convenient to have
something that holds in one place the image and where it is on screen. We’ll
call each moving image on screen an Actor. You can create an actor by supplying
at least an image name (from the images folder above). To draw the alien talked
about above:
alien = Actor('alien', (50, 50))

def draw():
    screen.clear()
    alien.draw()
You can move the actor around by setting its pos attribute in an update:
def update():
    if keyboard.left:
        alien.x -= 1
    elif keyboard.right:
        alien.x += 1
And you may change the image used to draw the actor by setting its image attribute to some new image name:
alien.image = 'alien_hurt'
Actors have all the same attributes and methods as Rect, including methods like .colliderect() which can be used to test whether two actors have collided.
Positioning Actors
If you assign a new value to one of the position attributes then the actor will be moved. For example:
alien.right = WIDTH
will position the alien so its right-hand side is set to WIDTH.
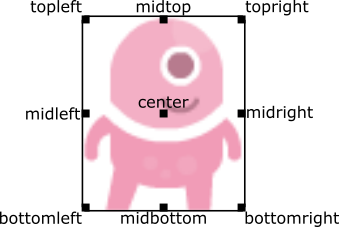
Similarly, you can also set the initial position of the actor in the
constructor, by passing one of these as a keyword argument: pos,
topleft, topright, bottomleft, bottomright, midtop,
midleft, midright, midbottom or center:
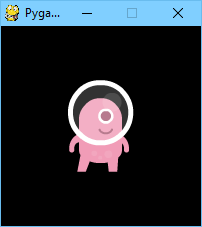
This can be done during creation or by assigning a pair of x, y co-ordinates. For example:
WIDTH = 200
HEIGHT = 200

alien = Actor('alien', center=(100,100))

def draw():
    screen.clear()
    alien.draw()
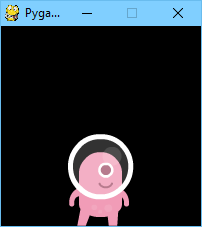
Changing center=(100, 100) to midbottom=(100, 200) gives you:
If you don’t specify an initial position, the actor will initially be
positioned in the top-left corner (equivalent to topleft=(0, 0)).
Anchor point
Actors have an „anchor position”, which is a convenient way to position the
actor in the scene. By default, the anchor position is the center, so the
.pos attribute refers to the center of the actor (and so do the x and
y coordinates). It’s common to want to set the anchor point to another
part of the sprite (perhaps the feet - so that you can easily set the Actor to
be „standing on” something):
alien = Actor('alien', anchor=('center', 'bottom'))
spaceship = Actor('spaceship', anchor=(10, 50))
anchor is specified as a tuple (xanchor, yanchor), where the values can
be floats or the strings left, center/middle, right, top or
bottom as appropriate.
Rotation
Nowe w wersji 1.2.
The .angle attribute of an Actor controls the rotation of the sprite, in
degrees, anticlockwise (counterclockwise).
The centre of rotation is the Actor’s anchor point.
Note that this will change the width and height of the Actor.
For example, to make an asteroid sprite spinning slowly anticlockwise in space:
asteroid = Actor('asteroid', center=(300, 300))

def update():
    asteroid.angle += 1
To have it spin clockwise, we’d change update() to:
def update():
    asteroid.angle -= 1
As a different example, we could make an actor ship always face the mouse
pointer. Because angle_to() returns 0 for „right”, the sprite we
use for „ship” should face right:
ship = Actor('ship')

def on_mouse_move(pos):
    ship.angle = ship.angle_to(pos)

Remember that angles loop round, so 0 degrees == 360 degrees == 720 degrees. Likewise -180 degrees == 180 degrees.
Distance and angle to
Nowe w wersji 1.2.
Actors have convenient methods for calculating their distance or angle to other
Actors or (x, y) coordinate pairs.
- Actor.distance_to(target)
Return the distance from this actor’s position to target, in pixels.
- Actor.angle_to(target)
Return the angle from this actor’s position to target, in degrees.
This will return a number between -180 and 180 degrees. Right is 0 degrees and the angles increase going anticlockwise.
Therefore:
Left is 180 degrees.
Up is 90 degrees.
Down is -90 degrees.
Transparency
Nowe w wersji 1.3.
In some cases it is useful to make an Actor object partially transparent. This can be used to fade it in or out, or to indicate that it is „disabled”.
The .opacity attribute of an Actor controls how transparent or opaque it
is.
When an actor is not at all transparent, we say it is „opaque” and it has
opacityof1.0, and you can’t see through it at all.When an actor is completely transparent, it has an
opacityof0.0. This will make it completely invisible.
To make an actor that is half-transparent (like a ghost), you could write:
ghost = Actor('ghost')
ghost.opacity = 0.5
This diagram shows the scale; the grey checkerboard is used to give the sense of transparency:

Wskazówka
The order in which you draw overlapping transparent objects still matters. A ghost seen through a window looks slightly different to a window seen through a ghost.
The Keyboard
You probably noticed that we used the keyboard in the above code.
If you’d like to know what keys are pressed on the keyboard, you can query the
attributes of the keyboard builtin. If, say, the left arrow is held down,
then keyboard.left will be True, otherwise it will be False.
There are attributes for every key; some examples:
keyboard.a  # The 'A' key
keyboard.left  # The left arrow key
keyboard.rshift  # The right shift key
keyboard.kp0  # The '0' key on the keypad
keyboard.k_0  # The main '0' key
The full set of key constants is given in the Buttons and Keys documentation, but the attributes are lowercase, because these are variables not constants.
Niezalecane od wersji 1.1: Uppercase and prefixed attribute names (eg. keyboard.LEFT or
keyboard.K_a) are now deprecated; use lowercase attribute names
instead.
Nowe w wersji 1.1: You can now also query the state of the keys using the keyboard constants themselves:
keyboard[keys.A]  # True if the 'A' key is pressed
keyboard[keys.SPACE]  # True if the space bar is pressed
Animations
You can animate most things in pygame using the builtin animate(). For
example, to move an Actor from its current position on the
screen to the position (100, 100):
animate(alien, pos=(100, 100))
- animate(object, tween='linear', duration=1, on_finished=None, **targets)
Animate the attributes on object from their current value to that specified in the targets keywords.
- Parametry
tween – The type of tweening to use.
duration – The duration of the animation, in seconds.
on_finished – Function called when the animation finishes.
targets – The target values for the attributes to animate.
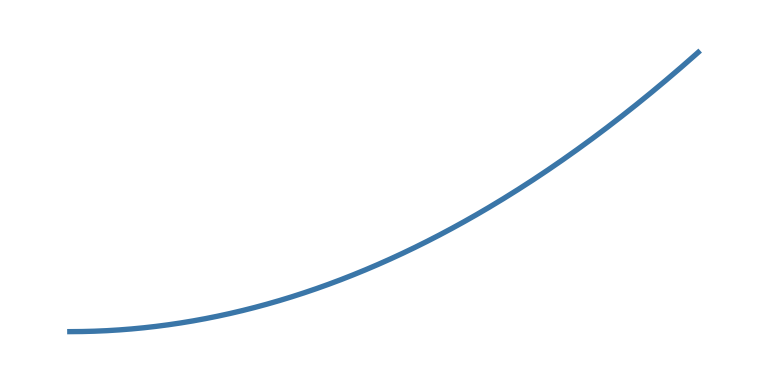
The tween argument can be one of the following:
«linear» |
Animate at a constant speed from start to finish |
|
«accelerate» |
Start slower and accelerate to finish |
|
«decelerate» |
Start fast and decelerate to finish |

|
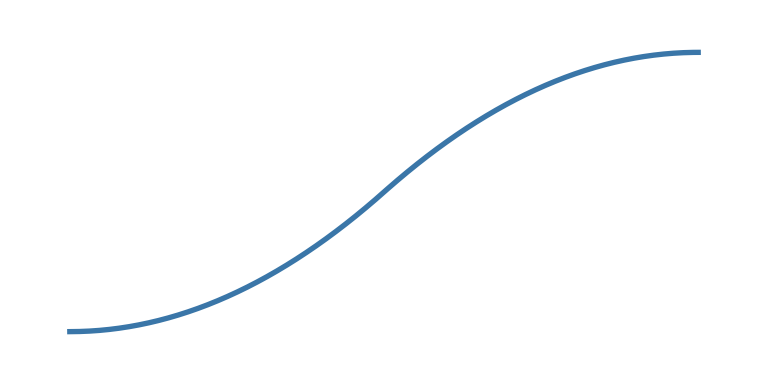
«accel_decel» |
Accelerate to mid point and decelerate to finish |
|
«in_elastic» |
Give a little wobble at the end |
|
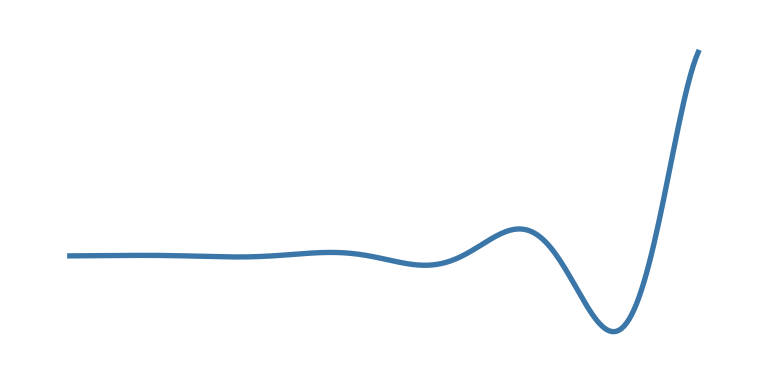
«out_elastic» |
Have a little wobble at the start |
|
«in_out_elastic» |
Have a wobble at both ends |
|
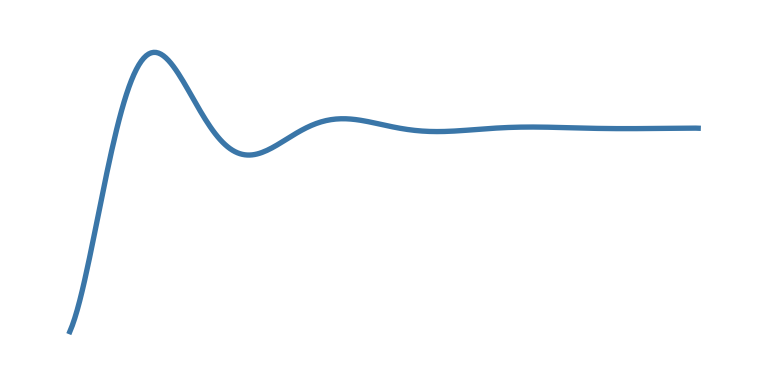
«bounce_end» |
Accelerate to the finish and bounce there |
|
«bounce_start» |
Bounce at the start |
|
«bounce_start_end» |
Bounce at both ends |

|
The animate() function returns an Animation instance:
- class Animation
- stop(complete=False)
Stop the animation, optionally completing the transition to the final property values.
- Parametry
complete – Set the animated attribute to the target value.
- running
This will be True if the animation is running. It will be False when the duration has run or the
stop()method was called before then.
- on_finished
You may set this attribute to a function which will be called when the animation duration runs out. The
on_finishedargument toanimate()also sets this attribute. It is not called whenstop()is called. This function takes no arguments.
Tone Generator
Nowe w wersji 1.2.
Pygame Zero can play tones using a built-in synthesizer.
- tone.play(pitch, duration)
Play a note at the given pitch for the given duration.
Duration is in seconds.
The pitch can be specified as a number in which case it is the frequency of the note in hertz.
Alternatively, the pitch can be specified as a string representing a note name and octave. For example:
'E4'would be E in octave 4.'A#5'would be A-sharp in octave 5.'Bb3'would be B-flat in octave 3.
Creating notes, particularly long notes, takes time - up to several milliseconds. You can create your notes ahead of time so that this doesn’t slow your game down while it is running:
- tone.create(pitch, duration)
Create and return a Sound object.
The arguments are as for play(), above.
This could be used in a Pygame Zero program like this:
beep = tone.create('A3', 0.5)

def on_mouse_down():
    beep.play()
Data Storage
The storage object behaves just like a Python dictionary but its contents
are preserved across game sessions. The values you assign to storage will be
saved as JSON, which means you can only store certain types of objects in it:
list/tuple, dict, str, float/int, bool, and
None.
The storage for a game is initially empty. Your code will need to handle
the case that values are loaded as well as the case that no values are found.
A tip is to use setdefault(), which inserts a default if there is no value
for the key, but does nothing if there is.
For example, we could write:
storage.setdefault('highscore', 0)
After this line is executed, storage['highscore'] will contain a value -
0 if there was no value loaded, or the loaded value otherwise. You could
add all of your setdefault lines towards the top of your game, before
anything else looks at storage:
storage.setdefault('level', 1)
storage.setdefault('player_name', 'Anonymous')
storage.setdefault('inventory', [])
Now, during gameplay we can update some values:
if player.colliderect(mushroom):
    score += 5
    if score > storage['highscore']:
        storage['highscore'] = score
You can read them back at any time:
def draw():
    ...
    screen.draw.text('Highscore: ' + storage['highscore'], ...)
…and of course, they’ll be preserved when the game next launches.
These are some of the most useful methods of storage:
- class Storage(dict)
- storage[key] = value
Set a value in the storage.
- storage[key]
Get a value from the storage. Raise KeyError if there is no such key in the storage.
- setdefault(key, default)
Insert a default value into the storage, only if no value already exists for this key.
- get(key, default=None)
Get a value from the storage. If there is no such key, return default, or None if no default was given.
- clear()
Remove all stored values. Use this if you get into a bad state.
- save()
Saves the data to disk now. You don’t usually need to call this, unless you’re planning on using
load()to reload a checkpoint, for example.
- load()
Reload the contents of the storage with data from the save file. This will replace any existing data in the storage.
- path
The actual path to which the save data will be written.
Ostrzeżenie
As you make changes to your game, storage could contain values that
don’t work with your current code. You can either check for this, or call
.clear() to remove all old values, or delete the save game file.
Wskazówka
Remember to check that your game still works if the storage is empty!